Introduction to Geode Cookies
What are geode cookies and why are they trending?
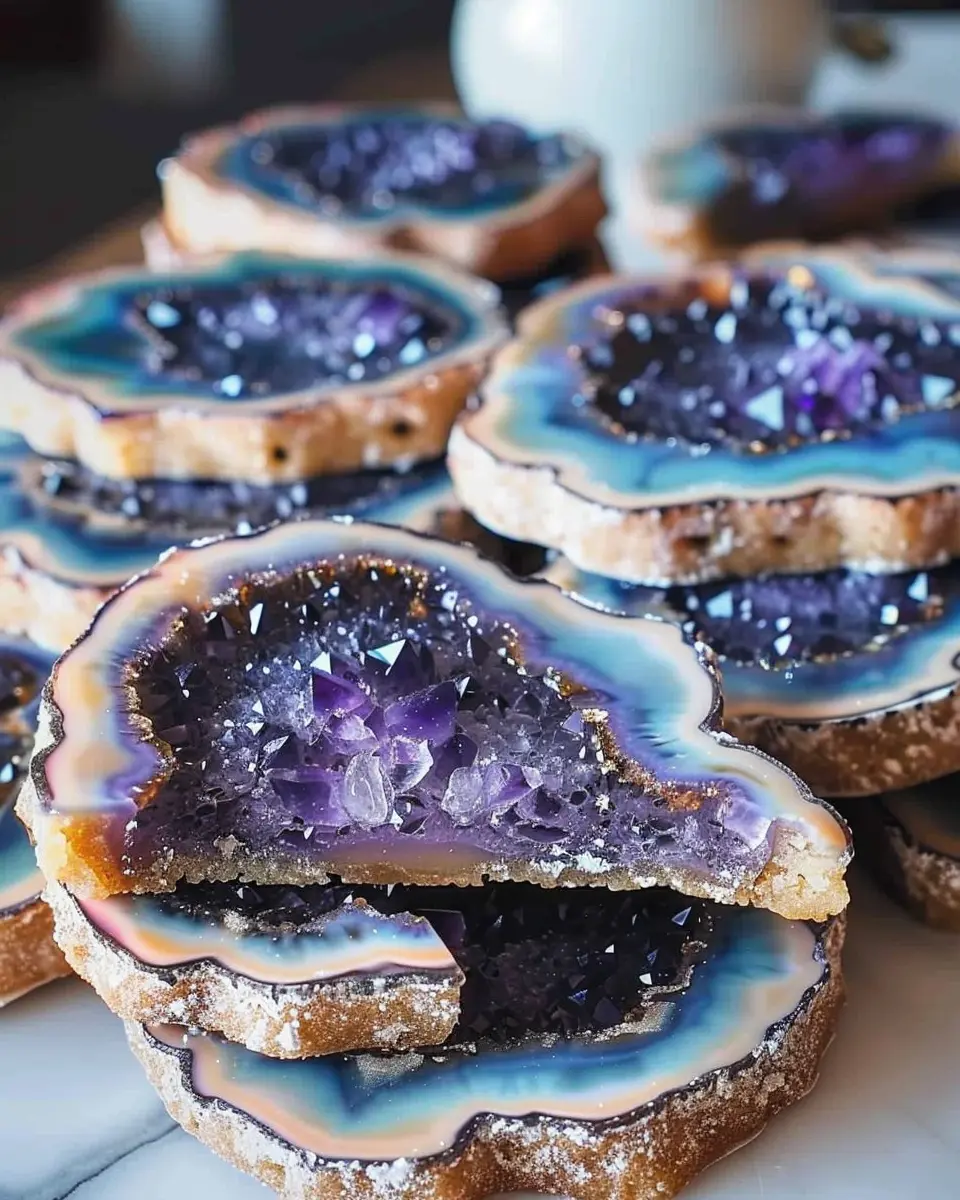
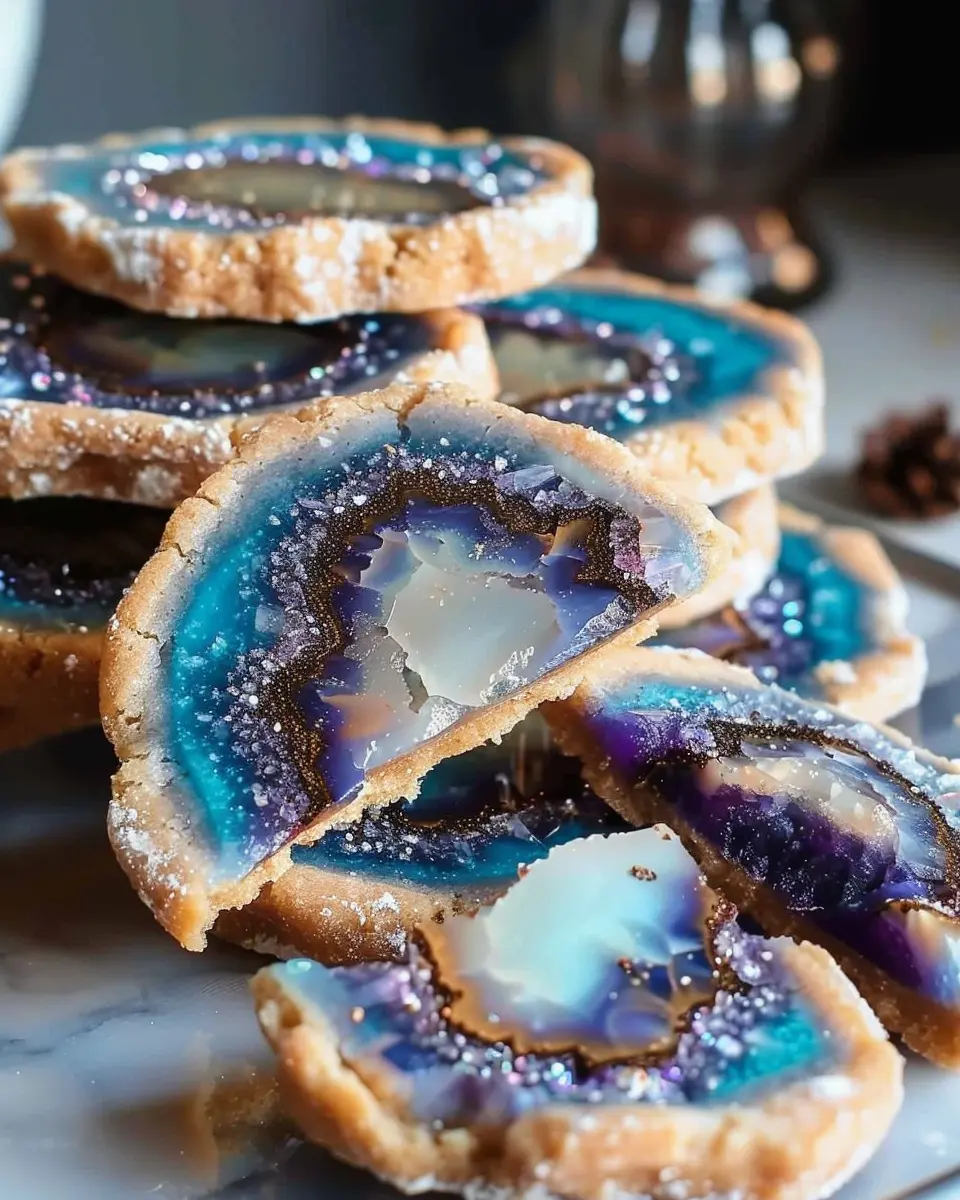
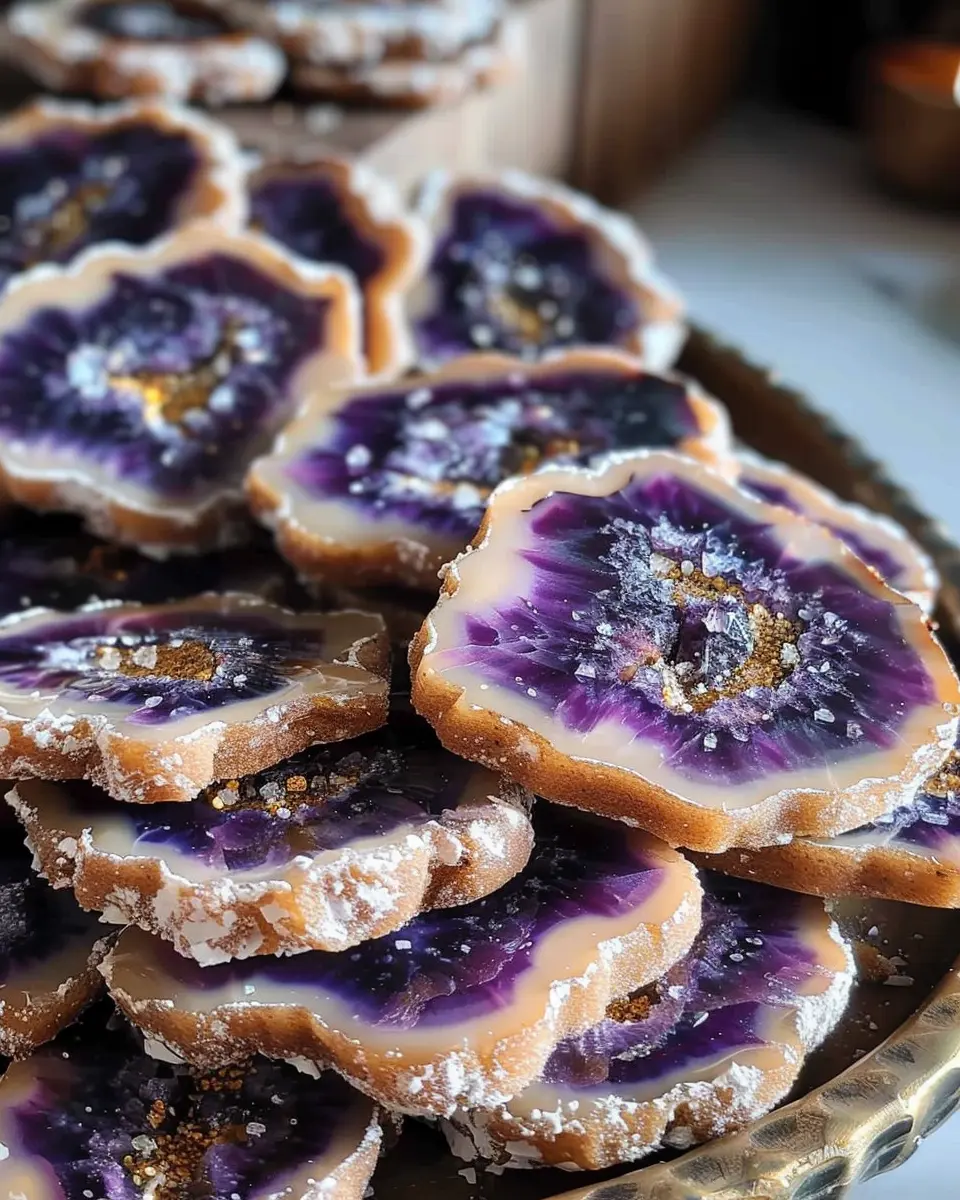
If you’re a fan of both baking and beautiful aesthetics, you’ve probably come across the newest trend in dessert décor: geode cookies. These delicious treats take the concept of traditional cookies to a whole new level by mimicking the stunning formations of geodes found in nature. But what exactly makes these cookies so special?
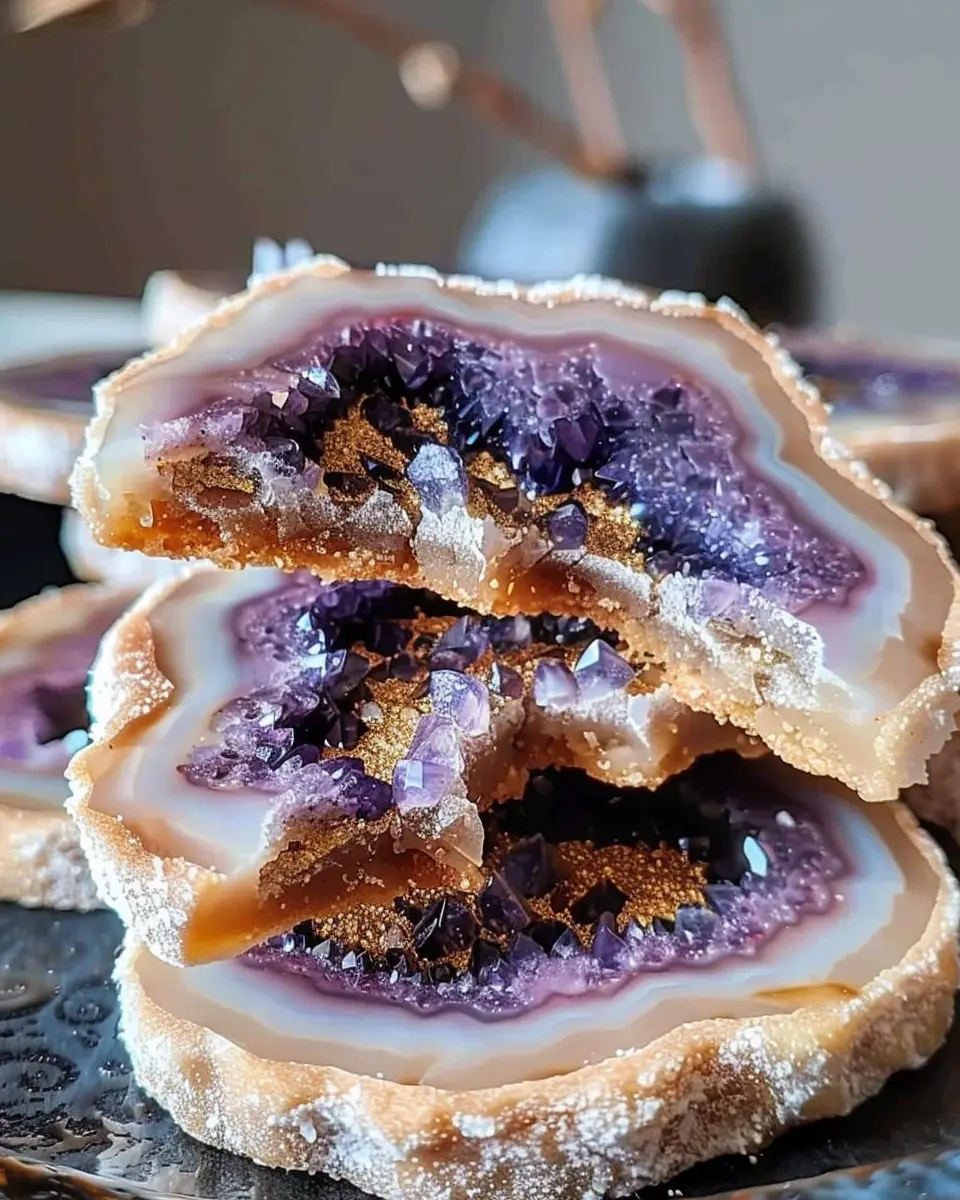
Geode cookies are essentially cookies that resemble the dazzling crystals found inside geodes. Through the use of royal icing and colorful sugar crystals, bakers can transform ordinary cookies into edible works of art. It’s this unique combination of food and visual appeal that has captured the attention of home bakers and social media users alike. Platforms like Instagram showcase thousands of beautifully crafted geode cookies, inspiring many to give this eye-catching trend a try. In fact, research from Google Trends indicates a dramatic increase in searches for geode cookies recipe, signaling a growing love affair with these gorgeous treats.
What’s not to love? They’re perfect for special occasions — think birthdays, bridal showers, or even just an afternoon treat to share with friends. Plus, they provide a creative outlet where you can experiment with colors, shapes, and designs. Making geode cookies can be a fun, hands-on activity, and you don’t need to be a professional baker to see impressive results. All you really need is a sense of adventure, a few ingredients, and a willingness to get a little crafty.
Here’s what you can look forward to as you embark on your baking journey:
- Creative Expression: Each cookie can be uniquely designed, allowing personal flair.
- Visual Appeal: They’re not just tasty; they’re a feast for the eyes, sure to impress anyone.
- Perfect for Gifting: These cookies are a thoughtful and sweet gesture for friends and family.
As you explore the geode cookies recipe, prepare to unleash your inner artist and impress everyone around you with both your baking skills and creativity! If you’re itching to dive deeper, check out some inspiring examples from Food52 or Bakerella.
Ingredients for Geode Cookies
When it comes to creating stunning geode cookies, the right ingredients are essential to achieve that dazzling, crystal-like effect. Let’s break it down! Here’s what you’ll need for this whimsical treat:
-
Cookie Base:
-
2 cups all-purpose flour
-
1 cup unsalted butter, softened
-
1 cup granulated sugar
-
1 large egg
-
1 tsp vanilla extract
-
1/2 tsp baking powder
-
1/4 tsp salt
-
Royal Icing:
-
3 egg whites (or 4 tbsp egg white powder)
-
4 cups powdered sugar, sifted
-
1 tsp lemon juice
-
Food coloring (for your unique hues)
-
Rock Sugar Crystals:
-
Various colors of rock sugar or edible glitter
-
Decorative Elements:
-
Edible gold/silver leaf (optional)
-
Optional: additional sprinkles or decorations for flair
When selecting your ingredients, consider using high-quality butter and pure extracts. You want each bite of these geode cookies to shine just like the gorgeous gems they resemble! For more detailed steps, check out this Royal Icing Guide.
Are you excited about baking these beautiful cookies? Let’s dive into the joy of creating your very own geode cookies recipe!
Step-by-Step Preparation of Geode Cookies
Creating a batch of geode cookies can be a delightful and rewarding experience. Not only do these cookies look stunning, resembling sparkling crystals in their centers, but they also taste amazing! Here’s how to make them step by step, guiding you through each stage of the process.
Gather and Measure Ingredients
Before diving into the mixing bowl, it’s crucial to assemble and measure all your ingredients. This not only saves time but also ensures you don’t miss anything, which can be disastrous in baking. You’ll need:
- 2 ¾ cups all-purpose flour
- 1 teaspoon baking soda
- ½ teaspoon salt
- 1 cup unsalted butter, softened
- 1 cup granulated sugar
- ½ cup brown sugar, packed
- 2 large eggs
- 1 teaspoon vanilla extract
- Candy crystals (rock candy or gemstones) for decorating
Taking a moment to measure might seem tedious, but trust me—it pays off in the long run. For further tips on ingredient importance, you might check out King Arthur Baking’s blog.
Mixing the Dry Ingredients
Begin this geode cookies recipe by mixing the dry ingredients. In a large bowl, whisk together the flour, baking soda, and salt. Whisking helps to aerate the flour and evenly distribute the leavening agents, which contributes to the texture of our cookies. Set this bowl aside for now; we’ll come back to it.
Creaming the Butter and Sugars
Now it’s time for a little “cream of the crop” action. In another bowl, combine the softened butter, granulated sugar, and brown sugar. Use a hand mixer or stand mixer on medium speed until the mixture is light and fluffy—about 2-3 minutes. The secret here is proper creaming; it incorporates air and helps create a tender cookie.
Combining Wet and Dry Ingredients
With the butter and sugars ready, it’s time to blend in the eggs and vanilla. Beat these wet ingredients into the creamed butter mixture until fully combined. Then gradually add your dry ingredients mixture, mixing on low speed until just incorporated. Overmixing can lead to tough cookies, and nobody wants that!
Folding in the Candy Crystals
This is where the magic happens! Gently fold in your candy crystals, slowing mixing until they’re evenly distributed. You want those vibrant colors to show through, so take your time with this step. It’s not just about flavor; the eye-catching sparkle is what makes geode cookies truly special.
Scooping and Shaping the Dough
Now it’s time to scoop and shape the cookies. Using a cookie scoop or two tablespoons, portion out the dough onto your baking sheet lined with parchment paper, leaving enough space between each cookie (about 2 inches) for spreading. If you’re feeling artsy, you can shape them a little for a more geode-like appearance.
Baking the Cookies
Preheat your oven to 350°F (175°C) while you prepare the dough. Bake the cookies for about 10-12 minutes until the edges are lightly golden. Keep an eye on them; you want a slight softness in the center as they’ll continue to firm up after coming out of the oven.
Cooling and Enjoying Your Cookies
Once baked, allow the cookies to cool on the baking sheet for a few minutes before transferring them to a wire rack. This step is vital—cooling helps them finish setting up and gives you that perfect chewy texture. Finally, serve them up on a beautiful platter and watch as your friends and family marvel at these stunning creations!
With each bite, they’ll not only taste amazing but will also remind you of your fun baking adventure. So grab your ingredients and get ready to impress with your geode cookies!
For more baking inspiration, consider exploring other delicious recipes from Food Network. Happy baking!
Variations on Geode Cookies
Adding Flavors: Citrus, Almond, or Spices
The beauty of geode cookies lies not just in their stunning appearance but also in how you can customize their flavor profiles. Have you ever considered adding a zesty twist? Adding citrus zest—like lemon or orange—will brighten the dough and give your cookies a refreshing taste. For a touch of warmth, almond extract infuses a nutty flavor that pairs beautifully with the sweetness of the sugar crystals.
If you’re feeling adventurous, try adding spices like cinnamon or cardamom. These fragrant spices can elevate your cookies to a whole new level. Plus, they complement the vibrant hues of the candy crystals, creating a cozy presentation perfect for cold-weather gatherings.
Curious to learn about flavor combinations? Check out culinary blogs like Serious Eats that dive into flavor pairings!
Colorful Toppings: Different Candy Crystal Combinations
Now, let’s talk about the myriad of topping options available for your geode cookies recipe. The real magic happens when you experiment with various candy crystal combinations.
- Rock Candy: This is a classic choice! You can find them in an array of colors—from bright blues to soft pinks.
- Sugar Crystals: Opt for coarse sugar in multiple hues for texture, such as a combination of purple and turquoise for a stunning effect.
- Sprinkles: Mix in edible glitter for an extra sparkle that kids (and adults) will love!
Remember, your cookie creations don’t have to stick to one theme. Why not create a batch where each cookie features a unique combination of colors and flavors? This way, you’ll have a delightful assortment that showcases your creativity. Plus, they make for an eye-catching centerpiece at any gathering!
Baking Notes for Geode Cookies
Tips for Getting the Right Texture
Achieving the perfect texture for your geode cookies is crucial for that delightful crunch! Here are a few tips to keep in mind:
- Chill the Dough: Don’t skip chilling the dough before baking; it helps prevent spreading and leads to a thicker cookie.
- Use Quality Ingredients: Opt for fresh, high-quality ingredients, especially when it comes to your sugar and butter. These make all the difference in flavor and texture.
- Monitor Baking Time: Every oven is different! Keep an eye on the cookies as they bake, pulling them out when the edges are just set for a chewy interior.
Common Mistakes to Avoid
Even seasoned bakers can trip up on a few common missteps when trying this geode cookies recipe. Here’s what to steer clear of:
- Overmixing: While you want to combine the ingredients, overmixing the dough can lead to tough cookies. Mix until just combined!
- Too Many Decorations: While it’s tempting to go wild with the sugar crystals, a little goes a long way in achieving that stunning geode look. Stick with moderation for the best results.
- Skipping the Pans: Using parchment paper or silicone mats can save you from cookie catastrophe on a sticky baking sheet.
For more baking tips, consider checking out sources like King Arthur Baking or Taste of Home. Happy baking!
Serving Suggestions for Geode Cookies
Perfect Pairings: Beverages and Complementary Treats
When it comes to elevating your geode cookies, think beyond just the cookies themselves! Pair them with refreshing beverages like herbal iced teas or creamy chai lattes. These gentle flavors allow the sweetness of the cookies to shine without overpowering each other. For a fun twist, offer a selection of dairy-free milk options; almond or oat milk can provide a nice complement.
You can also offer some also easy-to-prepare treats, such as fruit skewers or mini cheese boards featuring Turkey Bacon and Chicken Ham. This variety keeps the snack table inviting and makes it easy for guests to graze while they admire the stunning sparkle of the cookies.
Creative Presentation Ideas for Parties
Presenting your geode cookies in a visually appealing manner can create a lasting impression. Consider using decorative cake stands or clear jars filled with colored candies as backdrops. For a touch of elegance, add fairy lights around the serving area to enhance the cookies’ beauty. Remember, the way you serve them can enhance the overall experience, making your gathering memorable for everyone involved! If you’re organizing a themed event, feel free to check out this link for more inspiration on creative displays.
By thoughtfully curating your pairings and presentation, you’ll ensure that your geode cookies recipe becomes the highlight of any occasion. Happy baking!
Tips for Making Perfect Geode Cookies
Using the Right Tools and Utensils
Creating stunning geode cookies starts with having the right tools at your disposal. For this process, you’ll need a quality rolling pin, cookie cutters, and a baking sheet lined with parchment paper. Silicone mats can also be incredibly handy for achieving an even cook.
Don’t underestimate the importance of using a good mixer for your dough. A stand mixer can save you time and effort when blending ingredients. For the decoration phase, invest in a set of fine-tipped piping bags. They allow for precision when drizzling your edible rock candy, which is crucial for that eye-catching effect.
Storing Your Cookies for Freshness
Once your geode cookies have cooled and the decorations are set, proper storage becomes your priority to maintain their freshness and appearance. Store the cookies in an airtight container at room temperature to keep them soft for days.
If you plan to keep them longer than that, consider freezing them. Just ensure you separate layers with parchment paper to prevent sticking. When you’re ready to enjoy them, thaw at room temperature for the best taste and texture.
For more cookie storage tips, you can read about it on Food Network. With the right approach, your geode cookies will be a delightful treat anytime!
Time Breakdown for Geode Cookies
Preparation Time
Getting started with your geode cookies recipe is half the fun! Set aside about 30 minutes to gather your ingredients, mix your dough, and prepare your cookie shapes. This is when you can get creative and customize your cookies—not to mention, it’s a great chance to snack on some chocolate gems!
Baking Time
Once they’re shaped and ready, it’s time to bake! Plan for approximately 10–12 minutes in the oven. The cookies should be golden at the edges but still soft in the center for that perfect chewy texture.
Total Time
All in all, you’re looking at around 45 minutes to an hour from start to finish. Perfect for a weekend baking adventure or a mid-week pick-me-up. Get ready to impress your friends with stunning, delicious treats! If you’re interested in more baking timings, check out King Arthur Baking for additional insights.
Nutritional Information for Geode Cookies
Calories per Cookie
If you’re curious about the caloric content of these delightful geode cookies, each cookie packs around 120 calories. This makes them a perfect treat when enjoyed in moderation! Whether you’re enjoying a couple with coffee or serving them at a party, keeping a mindful eye on portion sizes can help you satisfy your sweet tooth without overindulging.
Sugars and Other Key Nutrients
Our geode cookies recipe features a lovely mix of sweetness and other nutrients:
- Sugars: Each cookie contains about 8 grams of sugar, derived from both natural and added sources.
- Fat Content: With roughly 5 grams of fat per cookie, they strike a balance between indulgence and nutritional awareness.
- Protein: While they’re primarily a dessert, you’ll still get about 1 gram of protein—thanks to the eggs and any nut toppings you might choose.
For more insights on sugar consumption and recommendations, the American Heart Association provides excellent guidelines. So, as you enjoy these beautifully crafted cookies, remember that moderation is key!
FAQs about Geode Cookies
Can I make these cookies gluten-free?
Absolutely! You can easily modify the geode cookies recipe to be gluten-free by using a 1:1 gluten-free flour substitute. Options like almond flour, coconut flour, or gluten-free all-purpose flour blend work wonderfully. Just keep in mind that you may need to adjust the liquid slightly to achieve the desired dough consistency. This tweak opens the door for a delightful treat that everyone can enjoy—gluten-sensitive friends included!
How can I store leftover geode cookies?
To keep your geode cookies fresh, store them in an airtight container at room temperature. They’ll last for up to a week, remaining deliciously chewy. If you want to prolong their life, consider freezing them. Simply wrap the cookies individually in plastic wrap and place them in a freezer-safe bag. When you’re ready to devour them, just take out how many you need, let them thaw, and enjoy!
How to customize geode cookies for special occasions?
Customization is one of the best parts of making geode cookies! For a birthday party, try using food coloring to match the party theme or add sprinkles for extra charm. For a wedding, soft pastels can create an elegant touch. You can also incorporate unique flavors like rosewater or citrus zest to enhance the bases of your cookies. Feeling adventurous? Try different geode patterns or shapes using various cookie cutters. The sky’s the limit!
Creating these cookies can be a creative outlet, so don’t shy away from experimenting. Want to learn more? Check out resources like The Kitchn for inspiration and tips on cookie decorating!
Conclusion on Geode Cookies
Recap and Encouragement to Try These Unique Treats
In this geode cookies recipe, we’ve walked through each delightful step, showcasing how you can create stunning and edible masterpieces. The blend of vibrant colors and textures will not only impress your friends but also make any occasion feel special. Trust me, nothing beats the joy of sharing these with loved ones; it’s a treat for both the eyes and the taste buds!
So why not give these a try? Experiment with your favorite flavors and colors, and don’t hesitate to make them uniquely yours. For additional inspiration, check out resources like Taste of Home or Food Network. Happy baking!
PrintGeode Cookies Recipe: Indulge in Stunning Crystal Treats

Make these stunning geode cookies that look beautiful and taste delicious!
- Prep Time: 20 minutes
- Cook Time: 12 minutes
- Total Time: 32 minutes
- Yield: 24 cookies
- Category: Dessert
- Method: Baking
- Cuisine: American
- Diet: Vegetarian
Ingredients
- 2 cups all-purpose flour
- 1 cup granulated sugar
- 1/2 cup unsalted butter, softened
- 2 large eggs
- 1 teaspoon vanilla extract
- 1 teaspoon baking powder
- 1/2 teaspoon salt
- 3 cups royal icing
- 1 cup edible glitter
- 1/2 cup colorful rock candy
Instructions
- Preheat the oven to 350°F (175°C).
- In a large bowl, cream together the butter and sugar until smooth.
- Beat in the eggs one at a time and stir in the vanilla.
- Combine flour, baking powder, and salt; gradually mix into the creamed mixture.
- Roll dough into small balls and place on a baking sheet.
- Bake for 10-12 minutes until lightly golden.
- Let cookies cool completely.
- Decorate with royal icing and sprinkle edible glitter and rock candy on top.
Notes
- Make sure the cookies are completely cool before decorating.
- You can use different colors of rock candy for various geode effects.
Nutrition
- Serving Size: 1 cookie
- Calories: 150
- Sugar: 12g
- Sodium: 50mg
- Fat: 7g
- Saturated Fat: 4g
- Unsaturated Fat: 2g
- Trans Fat: 0g
- Carbohydrates: 20g
- Fiber: 0g
- Protein: 2g
- Cholesterol: 30mg