Introduction to Burnt Basque Cheesecake
What is Burnt Basque Cheesecake and Why the Hype?
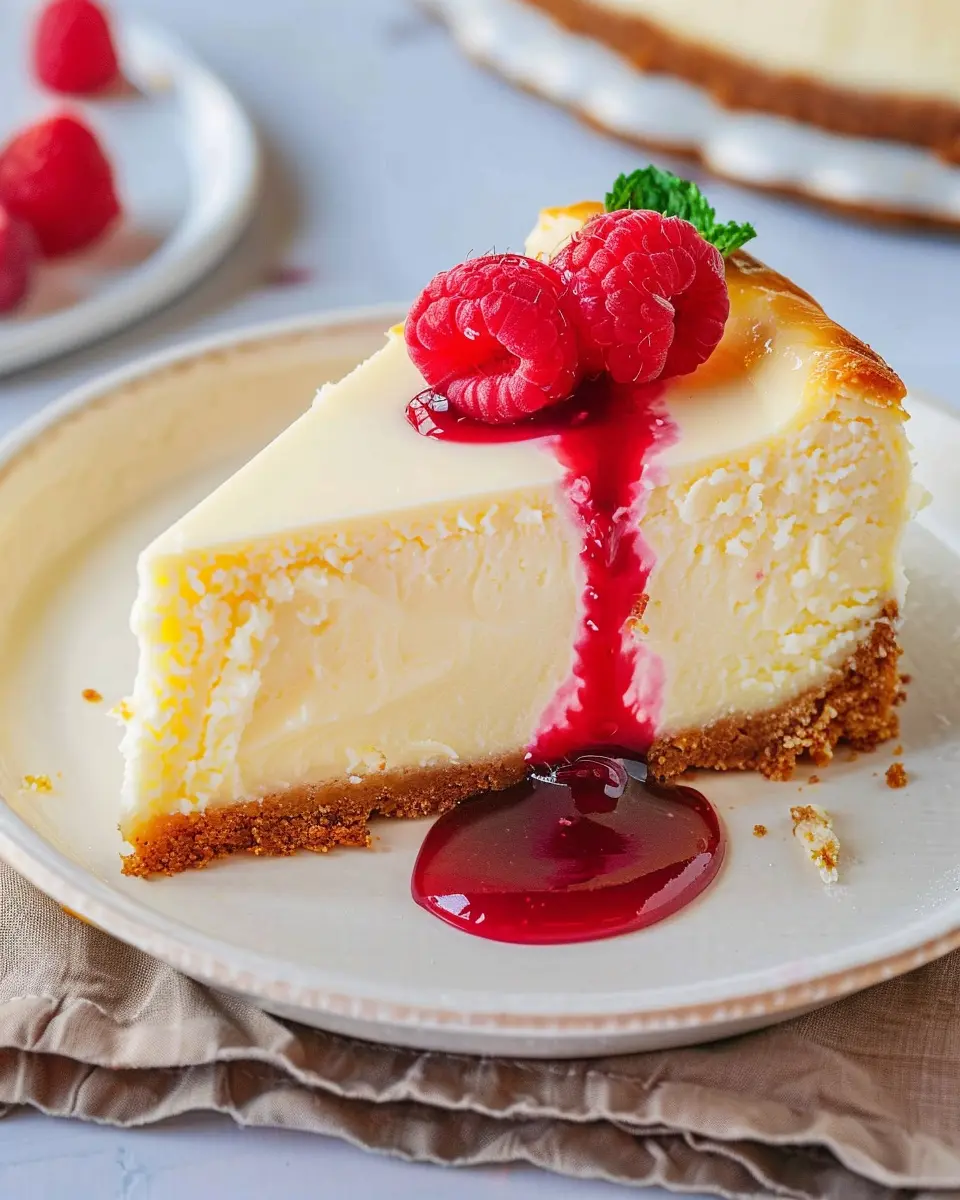
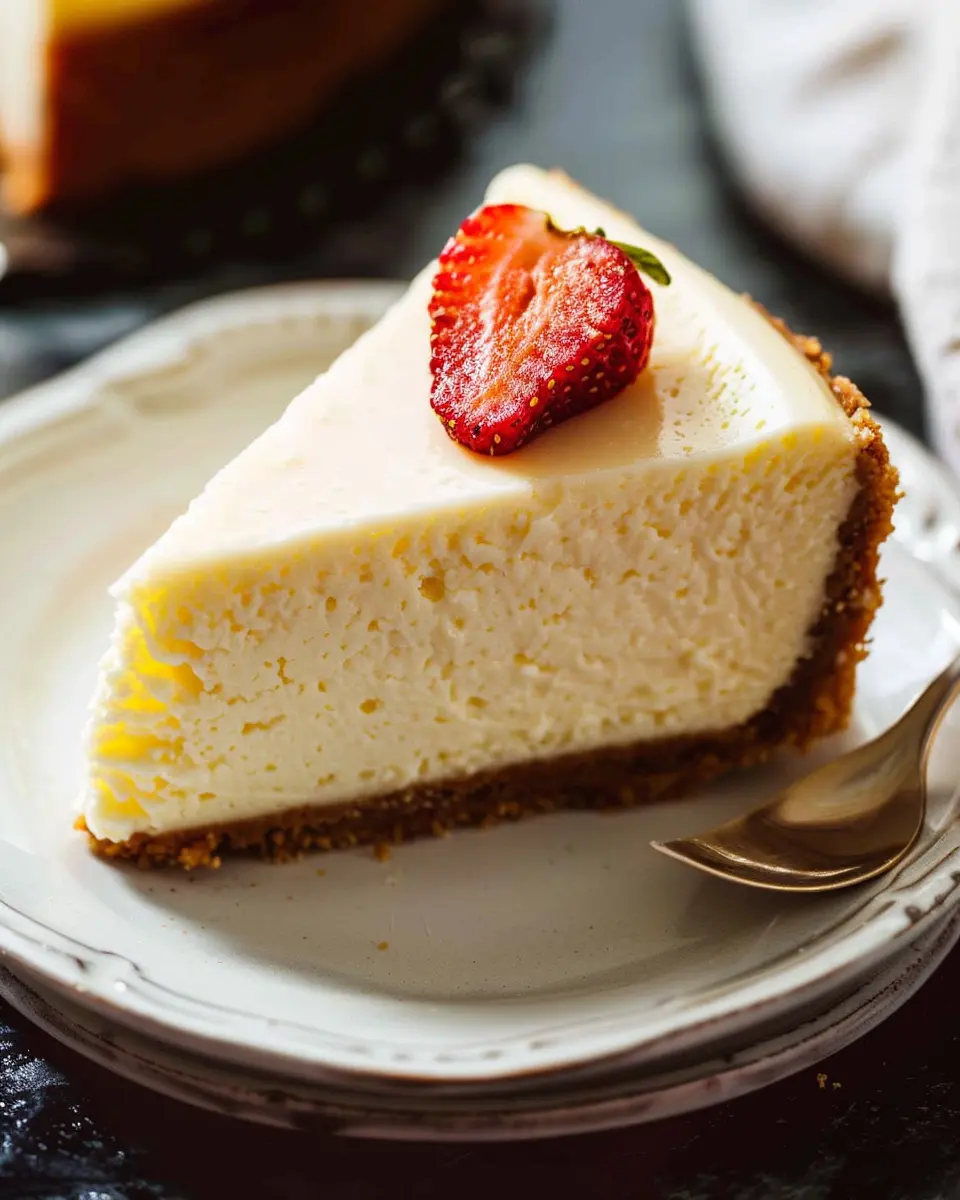
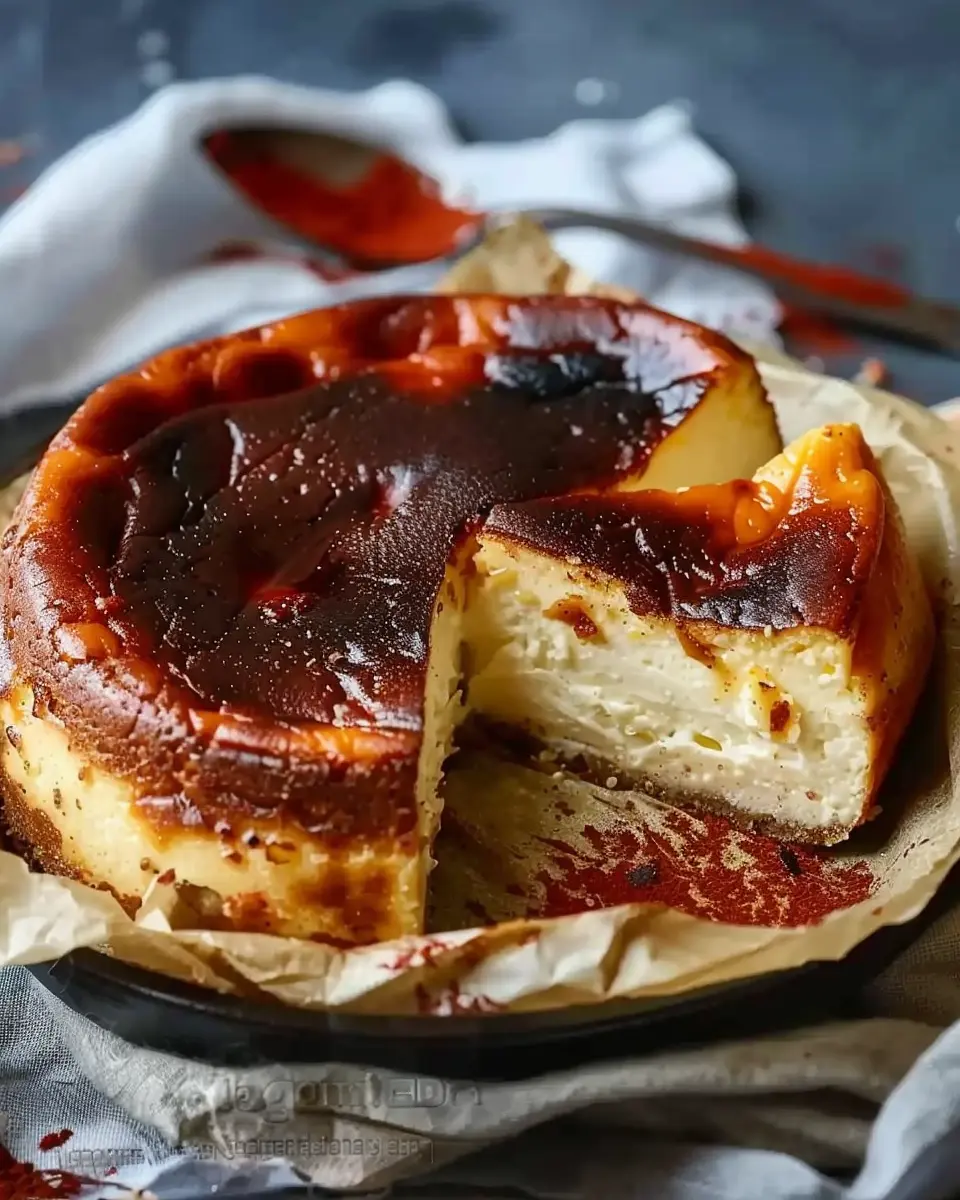
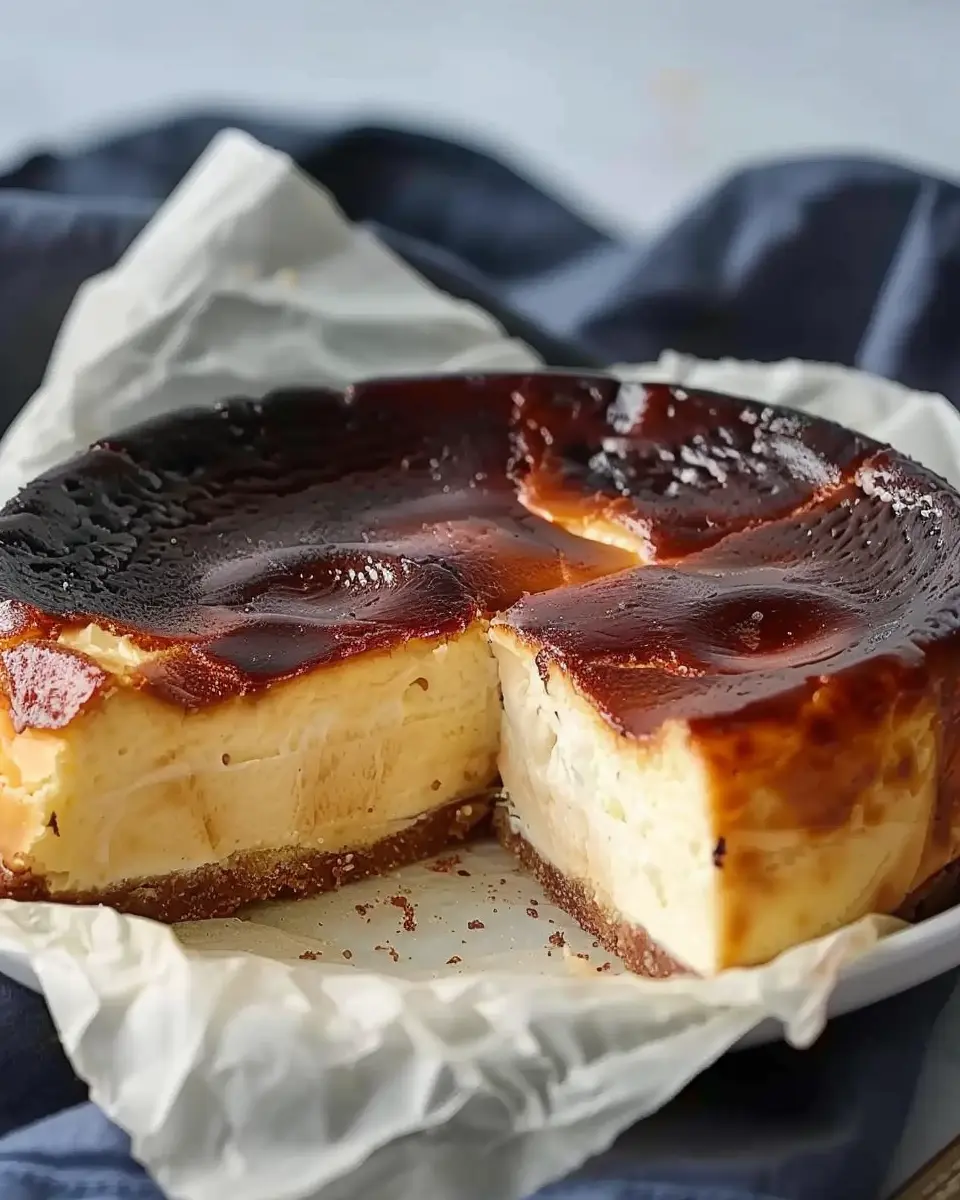
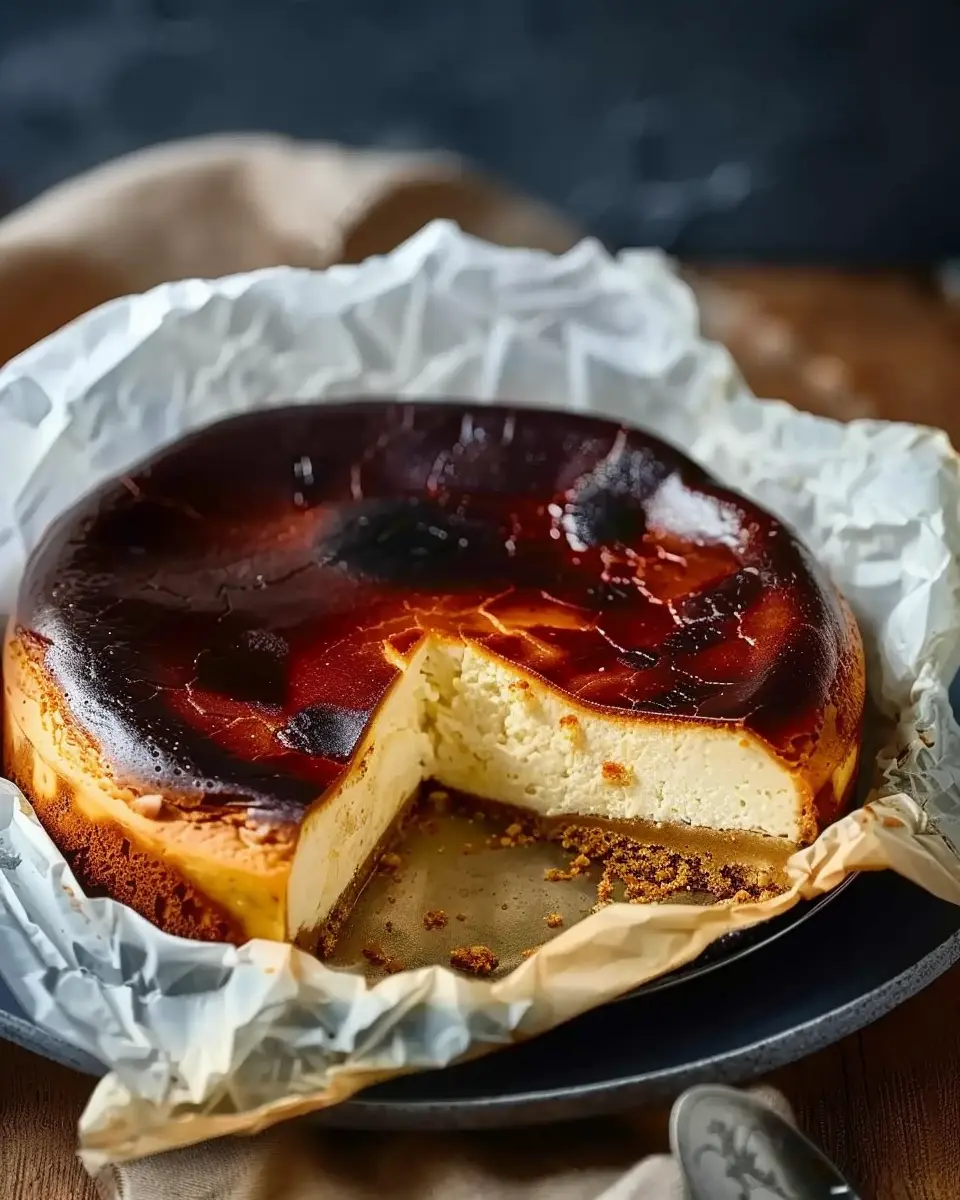
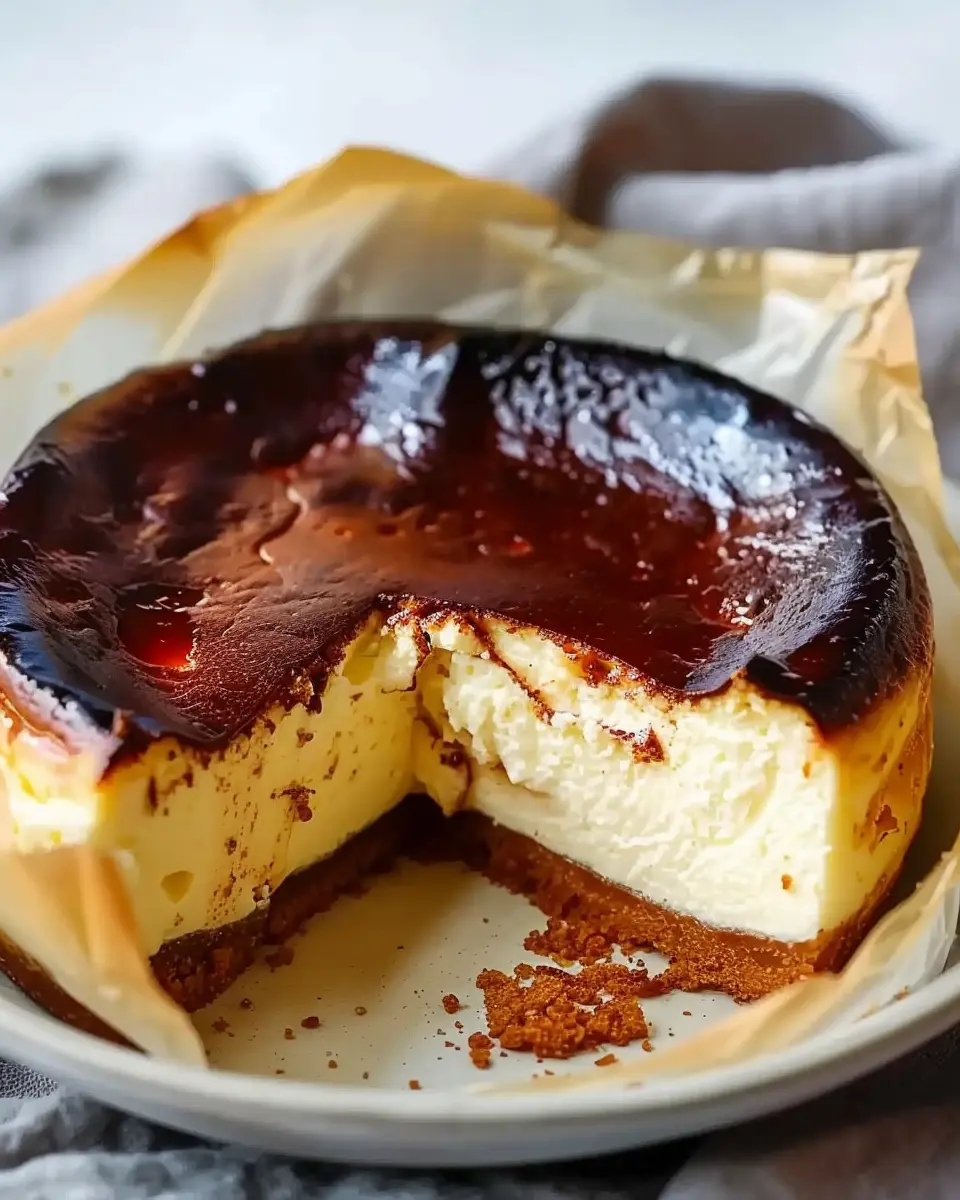
If you haven’t yet indulged in burnt basque cheesecake, you’re definitely in for a treat! Originating from the Basque region of Spain, this dessert has gained worldwide acclaim in recent years, and for good reason. With its crispy, caramelized top and creamy, custardy center, this cake defies the traditional cheesecake norms we know.
So, what makes this cheesecake so special? Its uniqueness lies in its simple yet innovative preparation. Unlike conventional cheesecakes that are baked in a perfectly shaped pan, the burnt basque cheesecake is baked at a high temperature until the top is dark and almost charred. This concept might seem unconventional, but it’s this very nature that creates a delightful contrast between textures. The outside is rich and slightly bitter due to the caramelization, while inside, you’ll find a sweet and creamy filling that melts in your mouth.
Speaking of taste, according to a survey by the National Cheesecake Association, over 20% of millennials prefer cheesecakes with new flavor combinations—making the burnt basque cheesecake a perfect fit! The enjoyment doesn’t just come from the cake itself; it also springs from its aesthetic appeal. It looks effortlessly rustic, making it a stunning centerpiece for any gathering.
For those who love sharing culinary experiences, the burnt basque cheesecake is ideal. Whether you’re hosting a small get-together or bringing a dish to a larger event, this cheesecake is sure to impress your friends and family. Plus, it’s super easy to make! You don’t need a water bath, and the simple ingredients ensure that it comes together quickly.
So, are you ready to dive into the world of burnt basque cheesecake? Grab your ingredients, channel your inner chef, and let this creamy delight elevate your next dessert experience! If you’re curious for inspiration on other delicious desserts, check out more classic cheesecake recipes here.
Ingredients for Burnt Basque Cheesecake
List of Essential Ingredients
Creating a decadent burnt basque cheesecake involves gathering a few key ingredients. Here’s what you’ll need:
- Cream Cheese: 500g, for that rich and creamy texture.
- Granulated Sugar: 150g, balancing sweetness.
- Heavy Cream: 200ml, enhancing the cake’s richness.
- Eggs: 3 large, providing structure and moisture.
- All-Purpose Flour: 20g, just enough for a slight firmness.
- Vanilla Extract: 1 teaspoon, for a hint of warmth.
These ingredients come together to create a cheesecake that’s unlike any other, with its luscious custard center and beautifully charred top.
Tips for Choosing Quality Ingredients
When crafting the perfect burnt basque cheesecake, the quality of your ingredients matters. Opt for:
- Full-fat cream cheese: This ensures a creamy consistency. Brands like Philadelphia are popular for their taste and texture.
- Fresh eggs: They contribute to the cake’s overall lift and richness. Choose organic or farm-fresh if possible.
- Pure vanilla extract: This makes a noticeable difference in flavor. Avoid imitation extracts for the best results.
Investing in top-notch ingredients will elevate your cheesecake and impress your guests. For more baking tips and expert advice, check out resources like King Arthur Baking and Serious Eats.
Your burnt basque cheesecake journey is just beginning!
Step-by-Step Preparation of Burnt Basque Cheesecake
Creating the burnt basque cheesecake at home is not just a cooking project but a delightful experience that you can share with friends or savor on your own. This recipe is straightforward, and with a few careful steps, you’ll have a rich, creamy treat on your hands. Let’s dive into the process!
Preheat and Prepare the Baking Tin
Before you do anything else, you need to preheat your oven to 400°F (200°C). This high temperature is key to developing that beautiful burnt exterior that defines the burnt basque cheesecake. While that’s warming up, take a 9-inch round cake pan and line it generously with parchment paper, allowing some paper to hang over the edges. This will help you lift the cheesecake out once it’s done and cooled. Don’t worry about being neat; it’s the rustic look that’s part of the charm!
Mixing the Cheesecake Base
In a large mixing bowl, combine your main ingredients:
- Cream cheese (two 8-ounce packages, softened)
- Granulated sugar (3/4 cup)
- Large eggs (3 room-temperature)
- Heavy cream (1/2 cup)
- Vanilla extract (1 teaspoon)
Using an electric mixer, beat the mixture on medium speed until thoroughly blended and fluffy. This step is all about getting air into the batter, which contributes to that deliciously creamy texture we all adore in cheesecake. If you don’t have a mixer, a sturdy whisk works too; just be prepared for a workout!
Combining Ingredients for Smoothness
Now it’s time to ensure your batter is as smooth as possible. Gradually add:
- All-purpose flour (1/4 cup)
Continue to mix on low speed until just combined. Avoid overmixing, as this could introduce too much air and affect the overall texture. The goal is a velvety mix that flows smoothly off your spatula—if you see any lumps, gently fold them in with a spatula to keep everything perfectly combined.
Pouring and Baking Your Cheesecake
Pour the mixture into your prepared baking pan, giving it a gentle shake to level the top. It’s always a good idea to tap the pan lightly on the counter to release any air bubbles. Now, pop that beauty into the preheated oven. Bake for 25-30 minutes, or until the top is significantly browned—almost burnt—and the center still has a slight jiggle. This may sound risky, but trust the process; it leads to that gorgeous, creamy texture.
While your cheesecake bakes, resist the urge to open the oven door! Keeping the heat steady is crucial for achieving that signature burnt top and creamy consistency.
Cooling and Chilling for Perfection
Once you’ve baked your burnt basque cheesecake, remove it from the oven and let it cool in the pan for about 15-20 minutes. The cheesecake will puff up during baking and then settle as it cools. After it’s slightly cooled, transfer it to the refrigerator for at least 4 hours, preferably overnight. How amazing will it be to pull out that creamy cheesecake the next day, ready to impress at your dinner party or just for dessert after a long week?
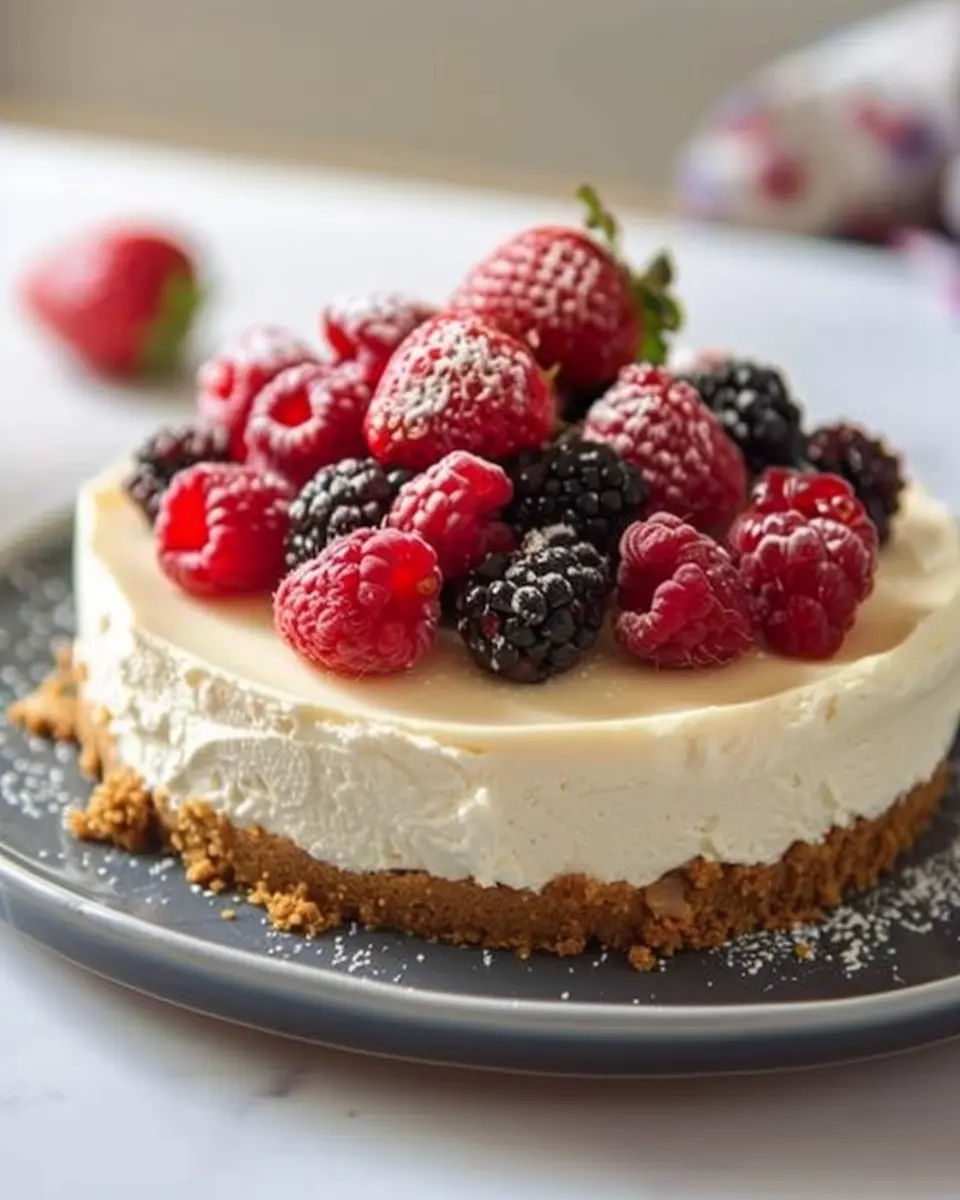
Before serving, you can dust it with confectioners’ sugar or top it with fresh berries for added flair. Your friends will be raving about this dessert—especially if you accidentally mention how easy the recipe is!
With these steps, you’ll be well on your way to mastering the art of the burnt basque cheesecake. For more tips and tricks, check out this guide on cheese types to discover how different cheeses can change the flavor profile of your cheesecake, or visit Serious Eats for additional insights into the science of baking. Happy baking!
Variations on Burnt Basque Cheesecake
Classic Burnt Basque Cheesecake
Let’s kick things off with the classic burnt basque cheesecake. This velvety dessert is a celebration of simplicity, using just a handful of ingredients: cream cheese, sugar, eggs, heavy cream, and a hint of vanilla. The magic happens when you bake it at a high temperature, resulting in a charred top that contrasts beautifully with the creamy center. In fact, many enthusiasts swear by this recipe as the best way to dessert! If you haven’t tried making it yet, check out this how-to guide for step-by-step instructions to nail that perfect burn.
Flavor Infusions: Citrus and Spice
Why stop at classic when you can adventure with flavors? Imagine incorporating citrus or spice into your burnt basque cheesecake. Lemon or orange zest can bring a refreshing brightness—a perfect match for the rich creaminess. Alternatively, a sprinkle of cinnamon or nutmeg can add a warm, cozy note that’s perfect for fall gatherings or winter festivities.
To experiment:
- Citrus Twist: Add 1-2 tablespoons of lemon or orange zest before blending the batter.
- Spiced Sensation: Mix in 1 teaspoon of cinnamon or a pinch of nutmeg to elevate the flavor profile.
Each variation maintains the hallmark of the rich, burnt top while taking your palette on an exciting journey. Curious about more innovative desserts? Explore this food blog for delightful inspirations!
No matter which variation you choose, these little tweaks can transform your burnt basque cheesecake into a showstopper that everyone will love.
Cooking Tips and Notes for Burnt Basque Cheesecake
Common Mistakes to Avoid
Creating a flawless burnt basque cheesecake can be tricky. One of the most common pitfalls is overmixing the batter. This can introduce too much air, resulting in a souffle-like texture rather than the creamy richness you desire. Make sure to mix just until combined. Additionally, some might be tempted to rush the chilling process; avoid this! Allow your cheesecake to set in the fridge for several hours for optimal flavor and texture.
Ensuring the Perfect Texture
For that signature custardy interior, use room-temperature ingredients, especially cream cheese. This ensures a smooth batter without lumps—nobody wants an uneven bite! Also, keep an eye on your baking time; every oven is different, so it might take a little longer or shorter than the suggested time. For expert guidance, check out trusted sources like Serious Eats or America’s Test Kitchen. Plus, remember that the cheesecake will continue to firm as it cools, so trust the process!
Serving Suggestions for Burnt Basque Cheesecake
Pairing with Fresh Fruits
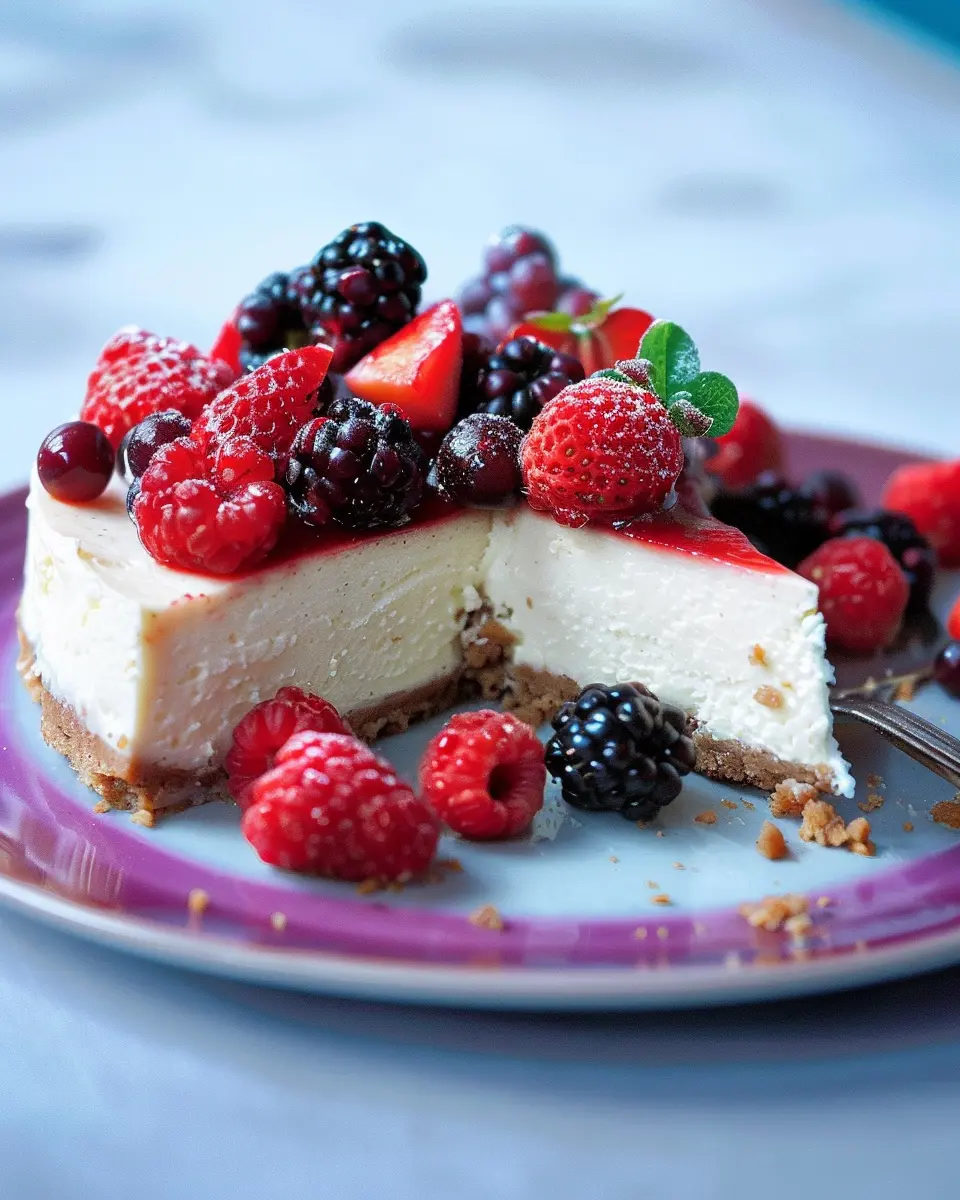
To elevate your burnt basque cheesecake, consider serving it with a vibrant array of fresh fruits. Think juicy berries, slices of ripe mango, or even a medley of citrus fruits. The tartness of these fruits helps balance the rich creaminess of the cheesecake, creating a delightful contrast that takes each bite to the next level.
Strawberries, blueberries, or raspberries are not just visually appealing but also add a refreshing touch. You can even make a quick fruit compote by simmering some fruit with a splash of honey for a sweet drizzle on top.
Serving with Chocolate Sauce
Another delicious option is to drizzle warm chocolate sauce over your burnt basque cheesecake. The combination of creamy, burnt outer layer with luscious chocolate creates a decadent dessert experience that will leave your guests in awe.
For an added twist, consider using dark chocolate for a richer flavor or white chocolate for something sweeter. Whipping up a homemade chocolate sauce is easy—just melt chocolate with a bit of heavy cream! This not only enhances the experience but also allows for customization.
By exploring these serving suggestions, you’re sure to impress whether it’s a casual gathering or a special occasion. Want to learn more about pairing dishes? Check out Epicurious for expert advice!
Time Breakdown for Burnt Basque Cheesecake
Preparation Time
Creating your delicious burnt basque cheesecake starts with about 20 minutes of prep. You’ll need to gather ingredients like cream cheese, eggs, and sugar, plus equipment like a mixer and baking pan. Efficiency is key here, so take a moment to make sure everything is in place.
Baking Time
Once your batter is ready, it’s time to pour it into a springform pan and pop it into the oven. This cheesecake needs around 25 to 30 minutes of baking at a high temperature to get that iconic burnt top. Keep an eye on it so you achieve that perfect, caramelized crust!
Total Time
All in all, you’re looking at approximately 50 to 55 minutes from start to finish. This includes prep and baking but doesn’t account for chilling time, which is essential for the ultimate creamy texture you desire. Be patient; it’s worth the wait! For a more detailed approach, check out resources from cooking experts like Bon Appétit or the Food Network.
Nutritional Facts for Burnt Basque Cheesecake
When indulging in a delicious burnt basque cheesecake, it’s helpful to know what you’re treating yourself to. Here’s a quick look at the nutritional facts that might interest you.
Calories
A typical slice of burnt basque cheesecake contains around 350 calories. Although this is a richer dessert, it can be a delightful part of an occasional treat.
Protein
Packed with cream cheese, this cheesecake is a good source of protein, providing about 6 grams per slice. Protein helps keep you full and satisfied, making it a great choice after a meal.
Sugars
Expect roughly 20 grams of sugar in each slice, which contributes to that delightful sweetness. While it’s higher than your average snack, moderation is key, especially when sharing at celebrations.
For more on the nutritional benefits of cream cheese, check out resources like Healthline. Remember, enjoying your favorite dessert occasionally is all about balance!
FAQs about Burnt Basque Cheesecake
Can I make a gluten-free version?
Absolutely! Making a gluten-free burnt basque cheesecake is quite simple. Instead of regular flour, you can use a gluten-free all-purpose flour blend. Many blends work well, so check labels for the best results. Additionally, certifying that your other ingredients, like cream cheese and vanilla extract, are gluten-free is crucial. If your local bakery has experience with gluten-free desserts, you could also ask for recommendations.
How do I store leftovers?
After enjoying your delicious burnt basque cheesecake, store any leftovers in an airtight container in the refrigerator. This cheesecake is best enjoyed within three to four days, maintaining its unique creamy texture. If you wish to keep it for longer, you can freeze slices wrapped tightly in plastic wrap and foil. Just be sure to let them thaw in the refrigerator before serving to allow the texture to return to its creamy glory.
What can I use as substitutes for ingredients?
No need to worry if you’re short on ingredients! Here are some substitutes for your burnt basque cheesecake:
- Cream Cheese: You can use mascarpone for a different flavor profile.
- Sugar: Consider coconut sugar for a lower glycemic option.
- Eggs: If you’re vegan or out of eggs, try using flaxseed meal or applesauce.
Don’t hesitate to experiment! Baking is often about creativity, so feel free to dive into those substitutions. If you’ve made any successful swaps, share them! It’s all about finding what works best for your palate. For more in-depth tips, check out Serious Eats or BBC Good Food.
Conclusion on Burnt Basque Cheesecake
Why You Should Try This Recipe at Home
Making a burnt basque cheesecake at home is not just about following a recipe; it’s about creating a culinary masterpiece that will undoubtedly impress your friends. This dessert is incredibly straightforward and requires few ingredients, making it accessible for even novice bakers. Plus, with its creamy, rich texture and slightly charred top, each bite is an unforgettable experience.
Cooking can be an excellent way to unwind after a long day. Why not try your hand at this delightful dessert? Whether for a special occasion or a cozy night in, this cheesecake is bound to be a crowd-pleaser. So grab your ingredients and get baking—you won’t regret it! For more delicious ideas, check out resources like Bon Appétit or Serious Eats for inspiration.
PrintBurnt Basque Cheesecake: Indulgent Recipe for Home Chefs

Discover the rich and creamy flavor of Burnt Basque Cheesecake, perfect for home chefs looking to impress.
- Prep Time: 20 minutes
- Cook Time: 1 hour
- Total Time: 5 hours 20 minutes
- Yield: 8 servings
- Category: Desserts
- Method: Baking
- Cuisine: Spanish
- Diet: Vegetarian
Ingredients
- 2 cups cream cheese
- 1 cup heavy cream
- 3/4 cup granulated sugar
- 3 large eggs
- 1 teaspoon vanilla extract
- 1/4 teaspoon salt
- 1/4 cup all-purpose flour
Instructions
- Preheat the oven to 400°F (200°C) and line a springform pan with parchment paper.
- In a mixing bowl, beat the cream cheese until smooth and creamy.
- Add the heavy cream, sugar, eggs, vanilla extract, and salt, and mix well until combined.
- Gradually add the flour and mix until just incorporated.
- Pour the batter into the prepared springform pan and smooth the top.
- Bake for 50-60 minutes, or until the top is burnt and the center is jiggly.
- Let it cool completely before refrigerating for at least 4 hours.
- Remove from the fridge, slice, and serve.
Notes
- For best results, use room temperature ingredients.
- Do not overmix the batter to prevent too much air from being incorporated.
Nutrition
- Serving Size: 1 slice
- Calories: 350
- Sugar: 28g
- Sodium: 200mg
- Fat: 27g
- Saturated Fat: 16g
- Unsaturated Fat: 11g
- Trans Fat: 0g
- Carbohydrates: 25g
- Fiber: 0g
- Protein: 6g
- Cholesterol: 150mg